Glad You Stopped By

By day I am a marketing professional for small businesses. I love to find and re-purpose forgotten objects, furniture and household items, turning them into usable stuff. I find interesting items at tag sales, flea markets and sometimes even thrown away along the side of the road. If I can find a use for something, I'll pick it up if it's the right price.

Saturday, September 26, 2015

Ode To Chem Lab, Industrial Stool Makeover

I found a really cool industrial stool at an estate sale in Connecticut earlier this summer.  I could have come home with a replica cannon that was also in the sale, but this seemed more practical.  It kind of reminded me of chemistry lab - bad memories. But, it had some promise, so home it came  . . . and sat all summer.


Today is a top 10 early Fall day in New England. The leaves are just starting to change, the temperature is in the 70's.  A perfect day to get this project going.


The first step was to remove the gray paint from the oak seat.  With a little Citris Strip (my favorite stripper), it came off easily.


There was some rust on the metal legs, but a little coarse sandpaper scuffed it up nicely.  A damp towel was all that was needed to finish prepping for spray painting.  I chose Rust-oleum, black satin.  It was a little tricky to spray the back of the chair, but after a couple of tries with plastic bags, I used packing tape to protect the wood. 


After the legs dried, it was on to applying a light coat of stain.  I used Minwax "Golden Pecan" as I had it on hand.


I always love watching the change as the wood grain begins to show itself.  How many high school kids sat right there as they struggled (well, I struggled) with their experiments.


And here is the finished project, waiting for a new home.


Painted Lamp Shades, a Pop of Color

I woke up today and decided to changeover the living room from our summer coastal theme to a comfy, cozy fall palette. Then I saw my dingy, boring table lamps and said . . . .  stop, bring on the color.

Nothing that a little paint won't fix.  I chose Benjamin Moore "Bird of Paradise" paint leftover from another project for its coral-orange color and began lathering on the paint using a foam brush.

Nothing complicated here - just make sure the shade is covered fully so that no light gets through.  I held it up to the sun a few times to check.


Here's the finished project. I really like them next to our falling leaves. Just need to let them dry.

And here they are in our living room.  I think I need to change the pillows and we'll be ready to bring on Fall!


Monday, September 7, 2015

Roadside Pick Of The Summer

There is nothing that gets a DIYer's heart pumping faster than a good roadside pick. As I was walking my dog in my neighborhood, I saw someone putting out 4 ugly looking chairs by the curb. I quickly scooted over to chat with the owner and learned that the chairs had come from a local hospital's reception area and were given to him when they remodeled a few years ago.  He had intended to refinish them but never got around to it.  And the best part . . . . they were FREE.  I asked if he'd put them behind the hedge so I could run home and return with a truck. Well, here they are.


And there they sat, all summer.  It was just too hot and humid in our neck of the woods to think about sanding.  Plus, it took a while to find the right fabric to cover the hideous vinyl seats.  After combing the thrift stores for a set of large napkins, I was able to find a remnant for $5.00 at one of my favorite shops, Knack, The Art Of Clever Reuse, located in Easthampton, MA.  I told myself that Labor Day weekend would be devoted to getting these chairs out of the garage and finishing them.


I hand sanded each piece just enough to scuff up the old finish.  I used Glidden Pecan stain and waited patiently for them to dry. After washing the vinyl covers, I laid out the seat cushions on my fabric.


I suppose I could have finished the edges off, but who's going to look under the chair, right?


And here's the finished project, perfect for my office conference table. 


Total cost:  $5.00.  I already had the stain, a foam brush and the staple gun.  Onto the next project - a retro industrial stool.  Stay tuned!


Tuesday, July 8, 2014

Gate-Legged Drop Leaf Dining Room Table Gets A Facelift

I picked up this gate-legged drop leaf dining room table at a tag sale in Branford, CT.  The garage and shed were loaded with tools and many pieces of furniture.  I almost walked past the table as it was underneath some boxes of rusty nails.  The family was in the process of cleaning out the house and I was able to get the table for $10.00.  I know - a steal.  (This is a picture of the "before")  Sorry about the sun glare.


I thought it would make the perfect "apartment sized" kitchen table, or maybe a work station.  It looked so cute all folded up! It is seriously heavy though.  Not sure I'd like to lug it up to a second floor apartment.


The legs were in really good shape with a sturdy base.


I began to sand the veneer top lightly using 3M stripping sandpaper, being careful to remove a few stains and scuff marks.


After the top was sanded, I applied a soft, damp cloth to remove the remaining dust and check for spots that needed to be touched up.  I haven't decided whether to stain the top or just seal it, but here it is.

Monday, September 17, 2012

Good Bye Pink Tile, Hello Coastal Cottage

My cape cod style home was built in the 1940's and has been a work in progress.  I have always had a love-hate relationship with the downstairs bathroom which was covered with UGLY Pink Tile covering half the walls.  I began researching ways to paint the tile, rather than replace it and started a Pinterest board on some options.  (I know I should have taken some before pics but once I started the project it seemed too late.)   Anyway, here's what I did.

1)  I slipped on a pair of rubber gloves and thoroughly scrubbed the tile down with a mixture of TSP and warm water and let it dry thoroughly.
 2)   Using a 3" foam roller, I applied a coat of Benjamin Moore latex white adhesive primer over the tile, including the built in soap dishes, etc.  I also decided to paint the dark woodwork around the windows and the ugly medicine cabinet using the same adhesive primer to avoid a lot of scraping.

3)  After letting the primer dry thoroughly for a few days, I applied a coat of Benjamin Moore Brilliant White latex paint with my foam roller, being careful to outline the tiles veritically and horizontally before painting the surfaces to make sure I covered the grout well.  Again, I let the paint dry for a couple of days.  (No one was thrilled with having the bathroom off limits AGAIN)

  
4)  Finally, I applied a coat of latex polyurethane to provide additional strength and let that dry another couple of days, then primed and painted the upper walls with Benjamin Moore Jamaican Blue (kind of a Tiffany Blue color).  

A quick trip to Bed, Bath and Beyond provided the off white cotton shower curtain, and Walmart for a tan runner (kind of looks like beach sand) and lacy white cafe curtains and tan hand towels, my own wicker basket and antique nightstand, plus a few accessories including a sea shell and a little beach print that I had completed the design. 

I felt a little sad about the demise of the Pink Tile, so  I made a wall decoration from three of the leftover tiles we had in the basement to help me remember just how much I hated them. 

Tuesday, August 14, 2012

Telephone Stand or iPhone Charger Station

This little telephone stand is the second piece I purchased on a recent trip to The Trading Post in Amherst, MA.  If you've never seen a telephone stand, imagine the old black dial up phone sitting on top and a stack of phone books stacked in the cubby below. 

 
The stand was painted brown and it was hard to see what kind of top I'd find after stripping it.  The back side featured a small cut-out in the cubby for cords. After stripping, I discovered that the top was a veneer. Oh well.  That's what makes "picking" fun!

 I decided to apply a light stain, repaint the base and call it a day.


Unfortunately, when my daughter arrived home to see the table, she asked if it would be too much trouble to paint the whole thing glossy white to go with her country cottage look. Sigh.

Here's the finished piece, ready to use as a night stand, perfect for an iPhone/iPad/Kindle charging station. Purchased for $15.00. Not bad.

Monday, August 13, 2012

Shabby Chic End Table

I paid a visit to The Trading Post in Amherst, MA recently looking for end tables.  This cute little pine piece was very sturdy.  It actually looks pretty good in the "before" picture, but was showing signs of its former use.


I applied a little stripper to the top and the drawer to see what condition the wood was in beneath all the paint.


The paint came off easily (only one coat!) revealing a honey-colored top which I decided to retain.
Because I wanted the "shabby chic" look, I did not strip and sand the edges all the way, leaving tell-tale signs of the former white paint exposed.

 A light maple varnish was applied, followed by one coat of polyurethane.

A fresh coat of glossy white paint was applied to the cabinet base and knob - and the table is now ready for its new home!

The end table was purchased for $20.00 - a bit more than I normally would pay, but Louise (The Trading Post proprietress extraordinaire) explained that August is a busy time of year when Five College Area students (Umass, Hampshire College, Smith College, Amherst College and Mt. Holyoke College) descend upon them looking for good apartment furniture. The law of supply and demand applies, making it difficult to negotiate a lower price. I still think this little piece was well worth the price and the fact that it took little time and resources to perk it up was an added benefit.

Tuesday, August 7, 2012

Shabby Chic Cottage Coffee Table

I was looking for a new refinishing project this summer and found this coffee table at a beach association tag sale in Old Saybrook, CT. It had been hauled out of the shed and used to showcase items for the sale.  As I moved things off the top of the table to investigate further, the original owner of the cottage, a small woman in her late 80's, began chatting with me as her grandson ran the tag sale.
 
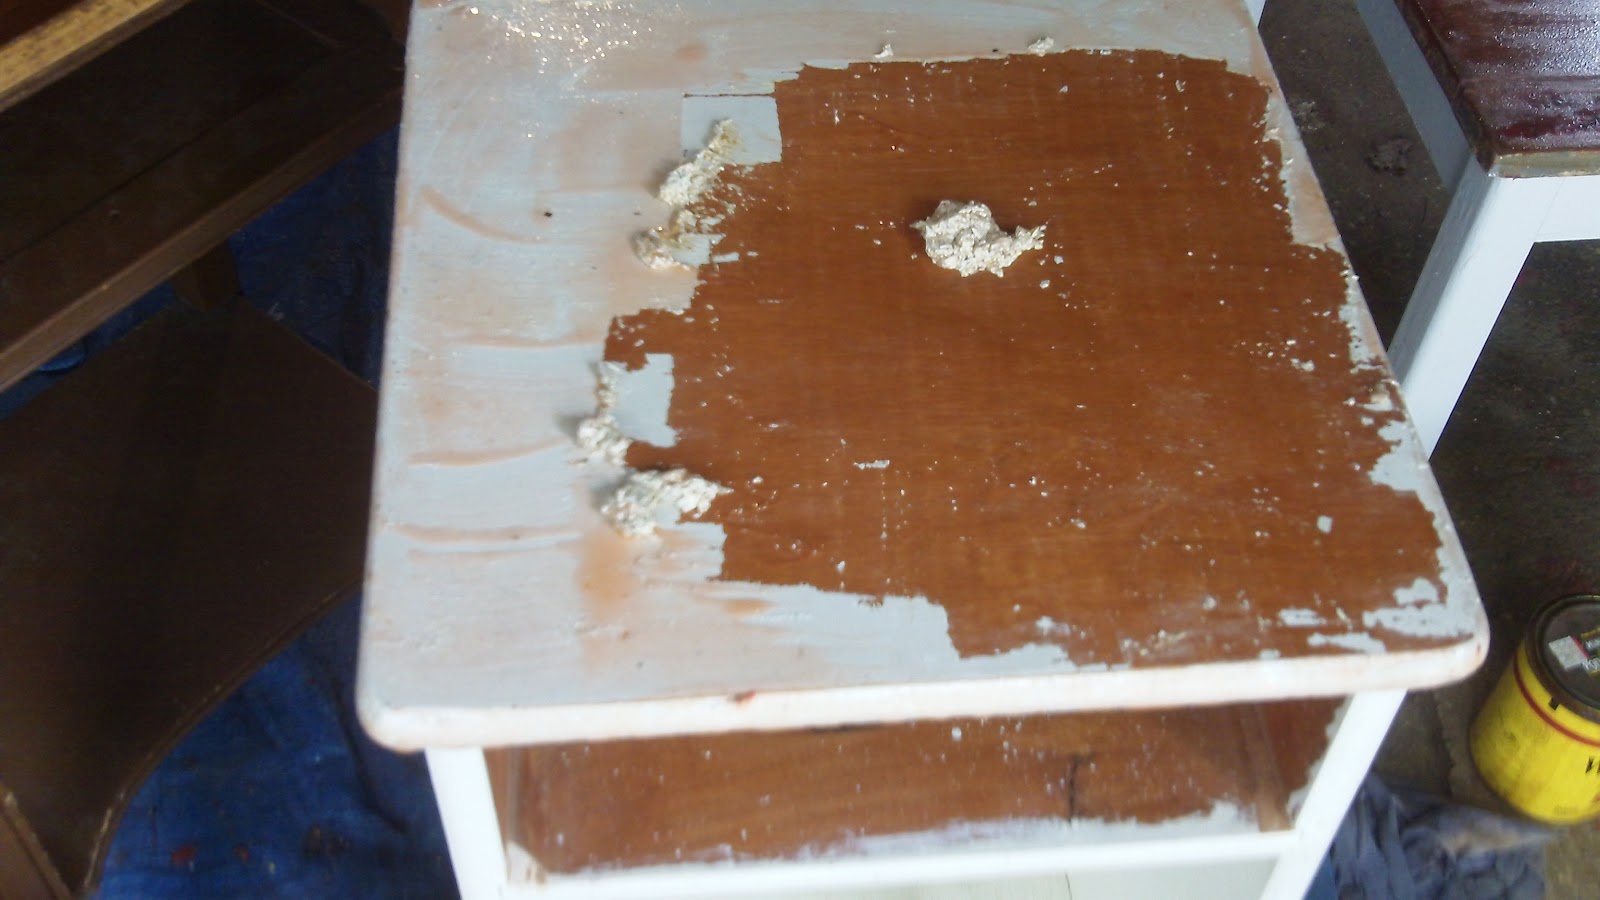
She shared the history of the little table, telling me that it had been crafted by her husband out of some leftover floorboards used when the cottage was built back in the 40's.  The top boards were a little loose but the base was solid as a rock.  Covered with gray chipping paint, it was hard to tell what would reveal itself when stripped, but that's half the fun.

The underside of the table showed bare wood, rusted brackets and zig-zag fasteners (brads?).  After a little haggling, I purchased the table for $10.

After applying Citristrip stripping gel and waiting a couple of hours the gray paint began to blister nicely and was easily removed, revealing a glimpse of the red paint and also a layer of creamy yellow paint.

I applied a second coat of stripper to remove the yellow paint which transformed my little table into a very red art project.  The third coat of stripper was somewhat effective, but the red paint had definitely seeped into the grain of the wood.
 The scraper was able to remove more of the paint and I began to see some of the imperfections which added character to the table top.
 I used my sander and 3M stripping paper to remove just enough of the red pain, keeping the scrapes and dings intact.
 I chose a maple stain to enhance the red paint.  I applied two coats. You can see a bit of the before and after here.
 The legs and sides were painted using a white gloss latex and I left the edge of the table kind of rustic, exposing some of each layer of paint.  This gave it the true shabby chic look I was after.

The last step was to apply two coats of Glidden polyurethane for durability as the table will most likely travel with my older daughter who will be moving into her first apartment very soon.  She loves cottage style furniture and decided this would be a great living room coffee table.


The finished project!  Sorry about the picture - don't know why it came out blurry.

Sunday, June 10, 2012

Butcher Block Baker's Rack Re-do

Saw this butcher block baker's rack at a tag sale in Southampton, MA and purchased for all of $3.00.  It was in very good shape overall.

It needed a good cleaning to remove some grease build up.  I used Dawn liquid on a wet cloth.  My Craftsman orbital sander w/ 60# paper did a great job sanding the water stains and various marks.

After sanding, a soft rag was used to remove any dust and it was ready to stain. I used Minwax Maple and applied two coats.

 At this point I could have applied polyurethane, but decided to see how it would survive without it.

Here is the completed project in its new home.  It replaced a larger wire baker's rack that was really too big for the space.  Now I even have a place to display my Mom's coffee cup and my daughter's tea cup that she made for me.